
How can you have your students document their learning in a way that gives you enough information to know when to step in and provide support? You can’t just give them 20% of their class time and not collect any information from them until the final step of sharing what they’ve learned. So, after each session of research, I want to know three things from my students: 1) What did they learn in their research today? 2) What is their plan for their next session? 3) What is their plan for sharing their learning?
You have to use technology to facilitate the collection of this information in a meaningful yet unobtrusive way. You may also want the information you gather to be public. But if you require students to fill out a huge template after every hour of work on The Awesome Project, you have taken the awesome away and turned the project into just another series of worksheets.
How can you resolve this tension? A number of tools are available for use: Google Forms, Spreadsheet, blogs, or wikis could all accomplish your goal.
If students already have their own blogs, it is a simple matter of having them write a post about what they have learned after each session. The benefit of this approach is that it allows students to personalize their learning. However it does make it difficult for you the facilitator to see an overview of the whole class at one time.
A class website or wiki could be set up quite easily using any number of sites (Google Sites or Wikispaces being major ones) which would let the classroom teacher see all of the work in one place. However this could cause a problem in editing, since if every student wanted to work on the website or wiki at the same time most programs don’t facilitate this.
One way to avoid the problem of multiple editors at the same time could be a Google Form. You would need to set up the question(s) that you want students to answer and send them the link. Essentially you are using Google Forms to create an online “exit ticket”. This would produce one nice looking spreadsheet with all of their responses inside, which solves the problems of the previous two approaches: you can look at all their responses at once, and you can get input from all of the students at the same time. However one challenge with Google Forms is that it doesn’t allow for much organic change; once you create the form and students start working on it, it’s not a simple process to make edits.
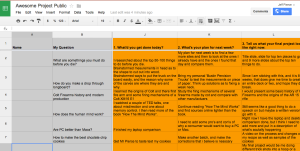
My approach is to take a simple Google Spreadsheet, give all students editing rights, and have it serve as the organizer for the project. Click on the image below to view what my students have done after two sessions version (with names taken out for privacy). Students simply go to their row on the spreadsheet and fill out the corresponding daily questions. It’s extremely easy to monitor and edit as the students are filling it out.
To complete Stage Six of The Awesome Project, first explore at least two of the different options listed above. This is especially important if there are tools listed that you are unfamiliar with. You may need to go to the help pages to learn how to use them. Don’t underestimate the amount of time you will need “playing” with a new tool!
Then, create your own template for monitoring students and post the link to your product in the comments section below. (Or just describe your plan for monitoring and supporting your students.)
Assessment:
Respond thoughtfully to the ideas of another learner who has already posted in the comments by asking them a clarifying question or building on their ideas. (Or if you are the first learner ask me a clarifying question in the comment section.)
Before you reach the next stage you have to share your work with your community one last time. Click on the lightbulb to move forward.

Image Licensing Information
Image licensed by Julia Bickerstaff under Creative Commons Attribution 2.0. Original image can be found here.
